


How to Curve Exterior HPL Panels During Installation
Nov 2, 2026 · @Puneet Singhal
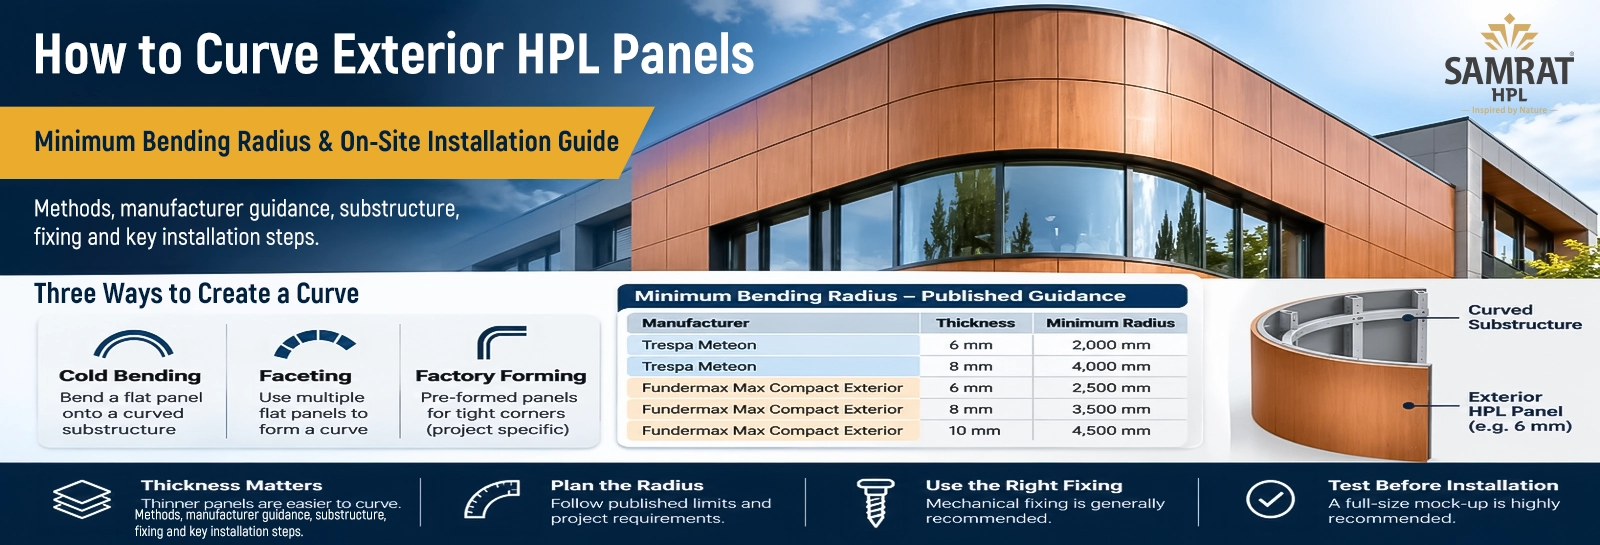
Yes, exterior compact HPL can be curved during installation, but only within a limit set by its thickness. Thin panels can be bent cold and fixed to a curved substructure. Two published manufacturer guides set the limit for 6 mm panels at 2,000 mm and 2,500 mm.
Rounded corners and curved walls are a common request from architects. The curve succeeds or fails at the design stage, long before a panel reaches the scaffold. This guide covers the methods, the limits, the substructure, the site sequence and the tests to run first.
One caution applies throughout. Limits published by one manufacturer describe that manufacturer’s product, so they do not transfer automatically to another panel.
Three ways to create a curve
The required radius decides the method: cold bending suits sweeping curves, faceting suits any radius, and factory forming suits tight corners.
| Method | How It Works | Suits | Main Limitation |
|---|---|---|---|
| Cold Bending on Site | A flat panel is pulled onto a curved frame with mechanical fixings. | Radii above the panel’s tested minimum. | Visible fixings, and it may sit outside product certificates. |
| Faceting | Flat panels follow the curve as a series of straight segments. | Any radius, including very tight ones. | The eye reads flats and joints, not a true curve. |
| Factory-Formed Parts | Panels are moulded or heat-formed in fixed equipment, then delivered curved. | Tight corners, with radii usually 10 to 50 mm. | Fixed shapes and lead times, and approval must be confirmed. |
Parklex Prodema describes faceting as the most straightforward option technically, because the panels are not bent. Its panels still need room for expansion and contraction.
The ICDLI leaflet on compact formed parts describes moderate outdoor uses such as bus stops and signs. It excludes applications that require third-party certification, so a formed facade part needs its own approval check.
Why not use a heat gun on site?
Heat forming relies on specially modified sheets, stationary bending units and clamping while the part cools, according to ICDLI. A heat gun on a scaffold offers none of that control. It should not be used to force a standard exterior panel into shape.
Why thickness controls the curve
Thickness matters twice: a thicker panel is stressed more at the same radius, and it is much harder to pull into shape. When a panel bends, one face stretches and the other compresses. The middle of the panel barely changes length.
The surface stress follows a simple beam formula, where E is the elastic modulus, t the thickness and R the radius:
\sigma \approx \frac{E \, t}{2R}
The force needed rises with the cube of thickness. At the same radius, an 8 mm panel takes about 2.4 times the bending effort of a 6 mm panel. A 10 mm panel takes about 4.6 times as much.
This is why curved work usually starts with the thinnest panel the project’s structural design allows. It is also why fixings matter so much: they hold that bending force for the life of the facade.
What manufacturers publish
Published minimum radii work out at roughly 330 to 500 times the panel thickness. A smaller radius means a tighter curve, so the minimum is the number that matters.
| Published Guide | Thickness (mm) | Minimum Radius (mm) | Radius ÷ Thickness | Estimated Surface Stress (MPa) |
|---|---|---|---|---|
| Trespa Meteon | 6 | 2,000 | 333 | 13.5 |
| Trespa Meteon | 8 | 4,000 | 500 | 9.0 |
| Fundermax Max Compact Exterior | 6 | 2,500 | 417 | 10.8 |
| Fundermax Max Compact Exterior | 8 | 3,500 | 438 | 10.3 |
| Fundermax Max Compact Exterior | 10 | 4,500 | 450 | 10.0 |
The last two columns are our own calculations, not manufacturer data. The stress estimate uses the 9,000 MPa modulus Fundermax publishes, applied to every row for comparison.
Three details change how these numbers should be read:
- Wind is not included. Fundermax labels its values as minimum radii without wind load.
- Certification may not apply. Trespa states that cold curving is not covered by its certificates or test reports.
- Direction is limited. Trespa’s guide covers convex curves only, so a concave curve needs its own check.
The estimated stress of 9 to 14 MPa looks small beside Fundermax’s stated flexural strength of at least 80 MPa. That gap is not spare capacity to spend on a tighter curve. A curved panel carries this stress permanently, alongside wind, moisture movement and concentrated load at the fixings.
Plan the curve before ordering panels
Five checks at drawing stage prevent most site problems, starting with the radius itself.
- Confirm the radius and its units. R150 means 150 mm or 1.5 m depending on the drawing, and that changes the method completely. Confirm which face of the build-up the dimension refers to.
- Check convex or concave. The two load the fixings differently. On a convex curve, a panel’s ends try to spring away from the frame.
- Choose the panel layout. Decide which panel dimension wraps the curve, then test that same orientation. Fundermax notes that its panels move about half as much lengthways as widthways, so the two directions are not identical.
- Respect minimum panel sizes. Short pieces give little leverage and are harder to pull onto the curve. Trespa sets a minimum length of 1,200 mm for 6 mm panels and 1,800 mm for 8 mm panels.
- Confirm approvals early. Ask the structural engineer and local authority whether a curved installation is acceptable, and what evidence they need.
Worked example: a 1.5 m radius corner
A 1,500 mm radius is tighter than both published 6 mm limits above, so it cannot rely on those figures. A quarter-circle at this radius has an arc length of about 2,356 mm. That needs two 1,300 mm wide panels, each turning through about 50 degrees.
There are four practical routes for this corner:
- Increase the radius to one the chosen panel has been tested for.
- Commission a project-specific test at 1,500 mm with the panel manufacturer.
- Facet the corner using narrow flat strips.
- Use a factory-formed part, if it can be approved for the facade.
Substructure and fixing rules
A curved panel is only as accurate as the frame behind it, and the frame needs more support and more fixings than a flat facade.
Substructure
On a curved wall, the rails usually stay straight and vertical, and only their positions follow the arc. This keeps the ventilation path vertical, as a rear-ventilated facade requires. An arched soffit is different, because there the rails themselves must be curved.
Rail spacing controls how smooth the curve looks. A stiff panel tends to flatten between supports, and a straight line between two rails falls short of the true arc. That gap equals spacing² ÷ (8 × radius):
| Rail Spacing (mm) | At 1,500 mm Radius (mm) | At 2,500 mm Radius (mm) | At 5,000 mm Radius (mm) |
|---|---|---|---|
| 200 | 3.3 | 2.0 | 1.0 |
| 300 | 7.5 | 4.5 | 2.2 |
| 600 | 30 | 18 | 9.0 |
A 600 mm spacing common on flat facades leaves 18 mm at a 2,500 mm radius, so the panel must bow noticeably between rails. Trespa advises supporting the panel over its full length as far as possible and reducing rail spacing where needed.
Fixings
- Use visible mechanical fixings. Both Trespa and Fundermax call for mechanical fastening on curves. Adhesive alone should not be asked to hold a panel in constant bending.
- Reduce fixing spacing. Trespa says spacing should be reduced by as much as 25%, with the final figure set by engineering calculation.
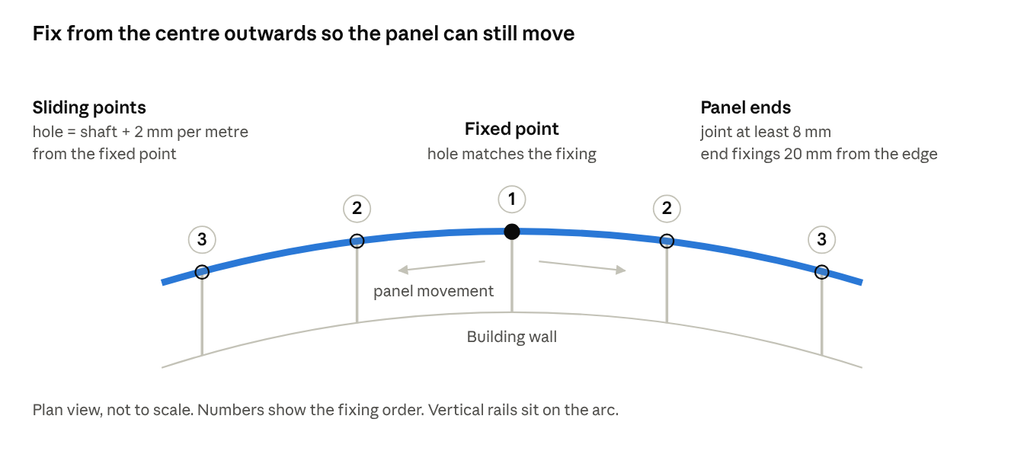
- Mind the end distance. Trespa requires fixings 20 mm from the two straight panel ends.
- Allow the panel to move. HPL grows and shrinks with humidity, while aluminium moves with temperature. Fundermax’s flat-panel rule sets sliding holes at the shaft diameter plus 2 mm per metre from the fixed point.
- Do not clamp the panel. Fundermax specifies 0.3 mm rivet head clearance using a flexible mouthpiece, and no countersunk screws.
- Leave open joints. Fundermax requires joints of at least 8 mm so panels can move without restraint.
The bending force is carried by the fixings at the panel ends. A rivet or screw torn loose there will not be fixed by adding sealant, so the end detail deserves the most care.
Installation sequence on site
The panel should be eased onto the frame gradually, working from its centre towards its ends.
- Store panels flat and acclimatise them. Fundermax advises flat storage at about 15 to 25°C and 40 to 60% relative humidity, and warns that poor storage can permanently deform panels.
- Survey the frame. Check every rail position against the arc using a radius template. Fundermax rules out elastic spacers in the substructure that allow more than ±0.5 mm of tolerance.
- Prepare the holes. Drill the panel while flat, with fixed and sliding holes marked to the design. Use a centring tool so the fixing sits in the middle of each sliding hole.
- Remove protective film from both sides at once. Fundermax requires this for its panels.
- Position and support the panel. Use at least two installers and padded clamps on longer panels. Do not let a clamp mark the decorative face.
- Fix the centre first. Set the fixed point near the middle of the panel, then its neighbours on the same rail.
- Work outwards rail by rail. Move evenly to both sides, so the bend develops gradually. Do not fix one end and then force the other end around.
- Fix the ends last. Hold the end of the panel tight to the rail, then place the end fixings without pinching the panel.
- Inspect before moving on. Check the fit against the template, the joint width, the fixings and the surface before starting the next panel.
Common mistakes
Most failures come from treating a curve as a flat facade with a bend added on site.
- Borrowing another brand’s radius. A published figure applies to that manufacturer’s panel and conditions.
- Designing to the absolute limit. A minimum radius without wind load leaves no allowance for site tolerance.
- Keeping flat-facade rail spacing. Wide spacing shows up as flats and uneven reflections, especially on gloss and dark decors.
- Skipping the movement detail. Tight holes and over-driven fixings restrain the panel, which adds stress to a panel already in bending.
- Fixing from one end. This pushes the whole bending force through the last few fixings.
- Forgetting tolerance in the frame. Forcing a panel over a rail that sits proud of the arc makes a local kink.
- Choosing thickness for flat-wall reasons alone. Moving from 6 mm to 8 mm can raise the minimum radius sharply, as the table above shows.
- Using heat to rescue a panel. Uncontrolled heating risks the surface and does not make a tight curve safe.
Test with a mock-up first
A full-size mock-up is the only reliable way to confirm a radius for a specific panel, because no published figure covers your exact build-up.
Build it with the actual panel thickness, decor, size, orientation, rails and fixings. Then check the following:
- The panel reaches the design radius without cracks in the surface or core.
- The surface shows no whitening, crazing or gloss change, including around holes.
- The panel sits tight on every rail, with no gap or kink.
- Fixings stay seated, and sliding points can still move.
- End fixings show no tearing, elongation or pull-through.
- The curve still looks smooth from normal viewing distance and in low-angle light.
- Joint widths remain even after a period of changing weather.
- Pull-out and wind load checks are completed and signed off by the structural engineer.
Test more than one panel and keep it under observation for a period agreed with the engineer. Cold bending keeps a permanent load in the material, so a panel that looks perfect on day one has not yet proved long-term performance.
Frequently asked questions
Can 6 mm exterior HPL be bent on site? Yes, within a tested radius and on a suitable curved substructure. Two published guides give 2,000 mm and 2,500 mm for their own 6 mm panels.
Can 8 mm or 10 mm panels be curved? Yes, but only to larger radii. Fundermax publishes 3,500 mm for 8 mm and 4,500 mm for 10 mm.
Can curved HPL use concealed fixings or adhesive? The guides reviewed here call for mechanical fixing on curves, and Trespa specifies visible fixings. Concealed or bonded systems need the system supplier’s specific confirmation.
Is a concave curve the same as a convex one? No. The fixings are loaded differently, and Trespa’s guide covers convex curves only. Test concave curves separately.
What if the corner is tighter than the minimum radius? Increase the radius, facet the corner or use a factory-formed part. A project-specific test can also establish whether the panel can go tighter.
Planning a curved facade?
Samrat is a 100% exterior HPL company, with 9 million m² installed until 2025. Share your drawings with our team at www.samrathpl.com, including the radius, panel size, wind load and curve direction. We can then discuss the right method and the testing your project needs.
This article is general guidance. It does not replace project-specific engineering, product test data or local building regulations.